💡 Auto-Sklong, in a nutshell!
💡 Auto-Sklong, in a nutshell!
Longitudinal datasets contain information about the same cohort of individuals (instances) over time,
with the same set of features (variables) repeatedly measured across different time points
(also called waves) 12.
Auto-Scikit-Longitudinal (abbreviated Auto-Sklong, pronounced /ˌɔːtoʊ ˌɛs keɪ ˈlɒŋ/ or "Aw-toh Ess-kay-long")
is an Automated Machine Learning (AutoML) library built on the General Machine Learning Assistant (GAMA)
framework. It introduces a novel search space leveraging both
Scikit-Longitudinal (Sklong) and Scikit-learn
models to tackle Longitudinal Machine Learning Classification tasks.
Auto-Sklong automates the design of predictive modeling pipelines tailored for longitudinal data, handling temporal dependencies seamlessly while integrating with the Scikit-learn ecosystem.
Note that while Longitudinal datasets have a temporal component, other types of datasets, such as time series,
also have a temporal component but are not considered longitudinal datasets. Time series data typically involves
a single variable measured at regular intervals over time, while longitudinal datasets involve multiple variables
measured across the same cohort of individuals at different time points. More is discussed in the FAQ.
However, I would like to highlight that time points are therefore considered as waves in Auto-Sklong 123.
To start your Longitudinal AutoML journey with Auto-Sklong, you first will have to install the library.
🛠️ Installation
Operating System Support
Auto-Sklong is currently supported on OSX (MacOS) and Linux.
Windows users should use notebooks or Docker with a Linux (
Ubuntu) distribution due to limitations with a dependency library. For more details, open an issue, I would be
happy to discuss this out further.
Python Version Compatibility
Auto-Sklong is currently compatible with Python versions 3.9 only.
Ensure you have one of these versions installed before proceeding with the installation.
Now, while we understand that this is a limitation, we are tied for the time being because of Deep Forest.
Deep Forest is a dependency of Auto-Sklong that is not compatible with Python versions greater than 3.9.
Deep Forest helps us with the Deep Forest algorithm, to which we have made some modifications to
welcome Lexicographical Deep Forest.
To follow up on this discussion, please refer to this github issue.
Please, start by choosing the installation method that best suits your needs:
To install Auto-Sklong, you can use pip:
This will install the latest version of Auto-Sklong from the Python Package Index (PyPI).
If you want to install a specific version, you can specify it like this:
Please note that here we assume you have a compatible Python version installed (3.9) and a working environment (e.g Conda).
To install Auto-Sklong using Conda, follow these steps:
- Open your terminal or Anaconda Prompt.
- Create a new Conda environment with Python 3.9:
- Activate the environment:
- Install
Auto-Sklong:
This will install Auto-Sklong in your newly created Conda environment.
To run Jupyter lab with Auto-Sklong, we recommend using UV, a fast and efficient Python package
manager that simplifies environment and dependency management.
Here's how to set it up:
- Install
UVif you haven't already. See UV installation instructions. - Run the following command to launch
Jupyter labwithAuto-Sklong:
Replace /usr/bin/python3 with the path to your desired Python version, as long as it is 3.9 and less than 3.10, it has been tested.
For more options, refer to the UV CLI documentation.
You are ready to play with Auto-Sklong in Jupyter lab! 🎉
How to install different version if we do not have 3.9?
You can install a different version of Python using uv by running:
How do I get the path to my just installed Python version?
You can find the path to your installed Python version by running:
This command will list all installed Python versions along with their paths. If a path is present, it means that the version is installed. You can then use the path in theuv run command.
This command creates a temporary environment with Auto-Sklong installed and starts Jupyter lab.
––––––––––––––
Some shoutouts to the UV team for their amazing work! 🙌
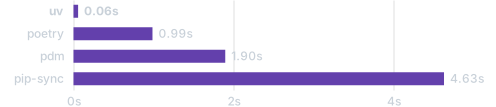
UV's readings recommendations:
To use Auto-Sklong in Google Colab, follow these steps due to compatibility requirements:
You also can follow the follwing gist as we reproduce the below's steps: gist –– or –– Open in Google Colab { .md-button }
Preliminary steps:
- Open a new
Google Colabnotebook. -
Open in a code / text editor the notebook you want to use
Auto-Sklongin, and proceed with the following modifications. -
Save the notebook.
You are ready to add stuff in your notebook!
-
Downgrade the Python version to 3.9, as
Auto-Sklongsupports this version. You can do this by running the following command in a code cell:Shoutout to @J3soon for this solution!
!wget -O py39.sh https://raw.githubusercontent.com/j3soon/colab-python-version/main/scripts/py39.sh
!bash py39.sh
This command installs Python 3.9 on your Colab instance.
-
It'll automatically refresh the kernel to ensure it uses Python 3.9, no worries!
- Install
Auto-Sklong:
- Remove
Scikit-learnif installed, asAuto-Sklongis a fork and may conflict:
- Remove & Re-Install
Scikit-lexicographical-trees, which is the modified version ofScikit-learnused byAuto-Sklong:
After these steps, you can use Auto-Sklong in your Colab notebook 🎉
Support for Marimo is incoming. If you're interested in contributing to this feature, please submit a pull request!
For developing your own scripts with Auto-Sklong, install it via pip:
Following the pip install, let's explore various scenarios. As follows:
🫵 Project Setup: Using PDM
If you’re managing your project dependencies with PDM, note that Auto-Sklong is a fork of Scikit-Learn
and is incompatible with the original Scikit-Learn package. To ensure compatibility, exclude Scikit-Learn from
your project dependencies by adding the following configuration to your pyproject.toml file:
This ensures that the modified version of Scikit-Learn—Scikit-Lexicographical-Trees—is used seamlessly within your project.
To install dependencies:
To install only production dependencies:
For additional configurations, refer to the PDM documentation.
🫵 Project Setup: Using UV
If you prefer UV for dependency management, configure your pyproject.toml file to override conflicting
packages. Add the following configuration:
Steps to set up your environment: 1. Create a Virtual Environment:
-
Pin the Required Python Version:
-
Lock Dependencies:
-
Install All Dependencies:
-
Run Tests:
For more information, refer to the UV documentation.
💻 Developer Notes
For developers looking to contribute, please refer to the Contributing section of the documentation.
🚀 Quick Start (Code)
Auto-Sklong has numerous primitives to deal with longitudinal machine learning classification tasks. To begin, use the
LongitudinalDataset class from Sklong to prepare your dataset, including data and temporal vectors. To train an AutoML pipeline on your data, use the GamaLongitudinalClassifier class.
"The
GamaLongitudinalClassifierin a nutshell: a wrapper around GAMA's AutoML system, tailored for longitudinal data, automating the search for optimal pipelines using a novel search space."
Where's the data at?
The Auto-Sklong library does not include datasets by default, mainly due to privacy reasons.
You can use your own longitudinal datasets
or download publicly available ones, such as the ELSA dataset.
If synthetic datasets are of interest, open an issue; I would be happy to discuss this further.
Here's our basic workflow example:
from sklearn.metrics import classification_report
from scikit_longitudinal.data_preparation import LongitudinalDataset
from gama.GamaLongitudinalClassifier import GamaLongitudinalClassifier

# Load your dataset (replace 'stroke.csv' with your actual dataset path)
dataset = LongitudinalDataset('./stroke.csv')

# Set up the target column and split the data into training and testing sets (replace 'stroke_wave_4' with your target column)
dataset.load_data_target_train_test_split(
    target_column="class_stroke_wave_4",
)

# Set up feature groups (temporal dependencies)
# Use a pre-set for ELSA data or define manually (See further in the API reference)
dataset.setup_features_group(input_data="elsa")

# Initialise the AutoML system with feature groups
automl = GamaLongitudinalClassifier(
    features_group=dataset.feature_groups(),
    non_longitudinal_features=dataset.non_longitudinal_features(),
    feature_list_names=dataset.data.columns.tolist(),
    max_total_time=3600  # Adjust time as needed (in seconds)
)

# Fit the AutoML system to the training data
automl.fit(dataset.X_train, dataset.y_train)

# Make predictions on the test data
y_pred = automl.predict(dataset.X_test)

# Print the classification report
print(classification_report(dataset.y_test, y_pred))
❓ Questions
What are feature groups?
Feature groups define the temporal dependencies in your longitudinal data. They are lists of feature indices corresponding to different waves. See the Temporal Dependency section for more details.
How do I set temporal dependencies?
Use pre-sets for known datasets like ELSA or define them manually based on your data structure. Refer to the Temporal Dependency section.
How do I tune hyperparameters?
Check the API Reference for a complete list of hyperparameters and their meanings.
Neural Network Models?
Auto-Sklong currently does not support neural network-based models. For similar projects that do, see
the FAQ section.
What's Next?
Next, we highly recommend that you explore the Search Space section, which provides a comprehensive
understanding of Auto-Sklong's novel search space for longitudinal pipelines.
Following that? Dive into the API Reference section, which provides detailed
information on the various search methods, hyperparameters, and classes available in Auto-Sklong.
🚨 Troubleshooting
Apple Silicon-based Macs require running under an x86_64 architecture to ensure proper installation and
functioning of Auto-Sklong. This is primarily due to the Deep-Forest dependency being incompatible
with Apple Silicon (ref Github Issue with Deep Forest
authors here).
The following steps are somehow extracted & adapted from https://apple.stackexchange.com/a/408379.
-
Install Rosetta 2 Rosetta 2 allows your Apple Silicon Mac (M1, M2, etc.) to run apps built for the
Note: When prompted, pressx86_64architecture, which is needed forAuto-Sklongdue to itsDeep-Forestdependency.'A'andEnterto agree to the license terms. -
Launch Terminal in
Note: To verify so you can runx86_64Mode Restart your terminal (close and reopen it), then start a new shell session under thex86_64architecture.uname -mand it should outputx86_64. -
Install
Auto-SklongviaCondawithPip - Verify Installation
And voila! You should now have Auto-Sklong installed and running on your Apple Silicon Mac.
-
Kelloway, E.K. and Francis, L., 2012. Longitudinal research and data analysis. In Research methods in occupational health psychology (pp. 374-394). Routledge. ↩↩
-
Ribeiro, C. and Freitas, A.A., 2019. A mini-survey of supervised machine learning approaches for coping with ageing-related longitudinal datasets. In 3rd Workshop on AI for Aging, Rehabilitation and Independent Assisted Living ( ARIAL), held as part of IJCAI-2019 (num. of pages: 5). ↩↩
-
Ribeiro, C. and Freitas, A.A., 2024. A lexicographic optimisation approach to promote more recent features on longitudinal decision-tree-based classifiers: applications to the English Longitudinal Study of Ageing. Artificial Intelligence Review, 57(4), p.84. ↩